
ChromeGo:Chrome一键翻墙包介绍
- ChromeGo一个集成 Goflyway、v2ray、Daze、SSR、Brook、Lightsocks、trojan、蓝灯、psiphon 等N多翻墙工具的电脑翻墙包(推荐按前面所列顺序依次尝试),所有工具全部内置免费服务器,长期更新。
- Github 项目地址:https://github.com/bannedbook/fanqiang
由于集成的工具过多,各个节点过于分散,没有做到一个很好的聚合,于是就有了下面介绍的几种提取免费节点的聚会脚本。
利用 Python 脚本提取
绵羊的金属精炼器
ChromeGo 里面用到的节点池:https://github.com/Alvin9999/pac2/tree/master
聚合过程就是提取他各个客户端里面的节点,用了 Python 进行了简单的处理转换,然后放 action 里面每天跑两次。
具体操作见 Github 项目地址:https://github.com/vveg26/chromego_merge
演示视频:
chromegopacs
- Github 项目地址:https://github.com/vveg26/chromego_merge
- 项目介绍:提取 ChromeGo 经常更新维护的部分节点,显示节点地理位置,6小时运行一次 action 资源。
- 订阅链接:
https://raw.githubusercontent.com/markbang/chromegopacs/main/hy2pac.txt

利用 Cloudflare Wokers 自动提取
Github 项目地址:https://github.com/shiteThings/extractNodes
Cloudflare 创建 Workers
登录 Cloudflare,点击左侧 Workers 和 Pages,点击右侧的 创建应用程序 按钮。点击 创建 Worker 按钮。
命名新的脚本名称,点击 部署 按钮。
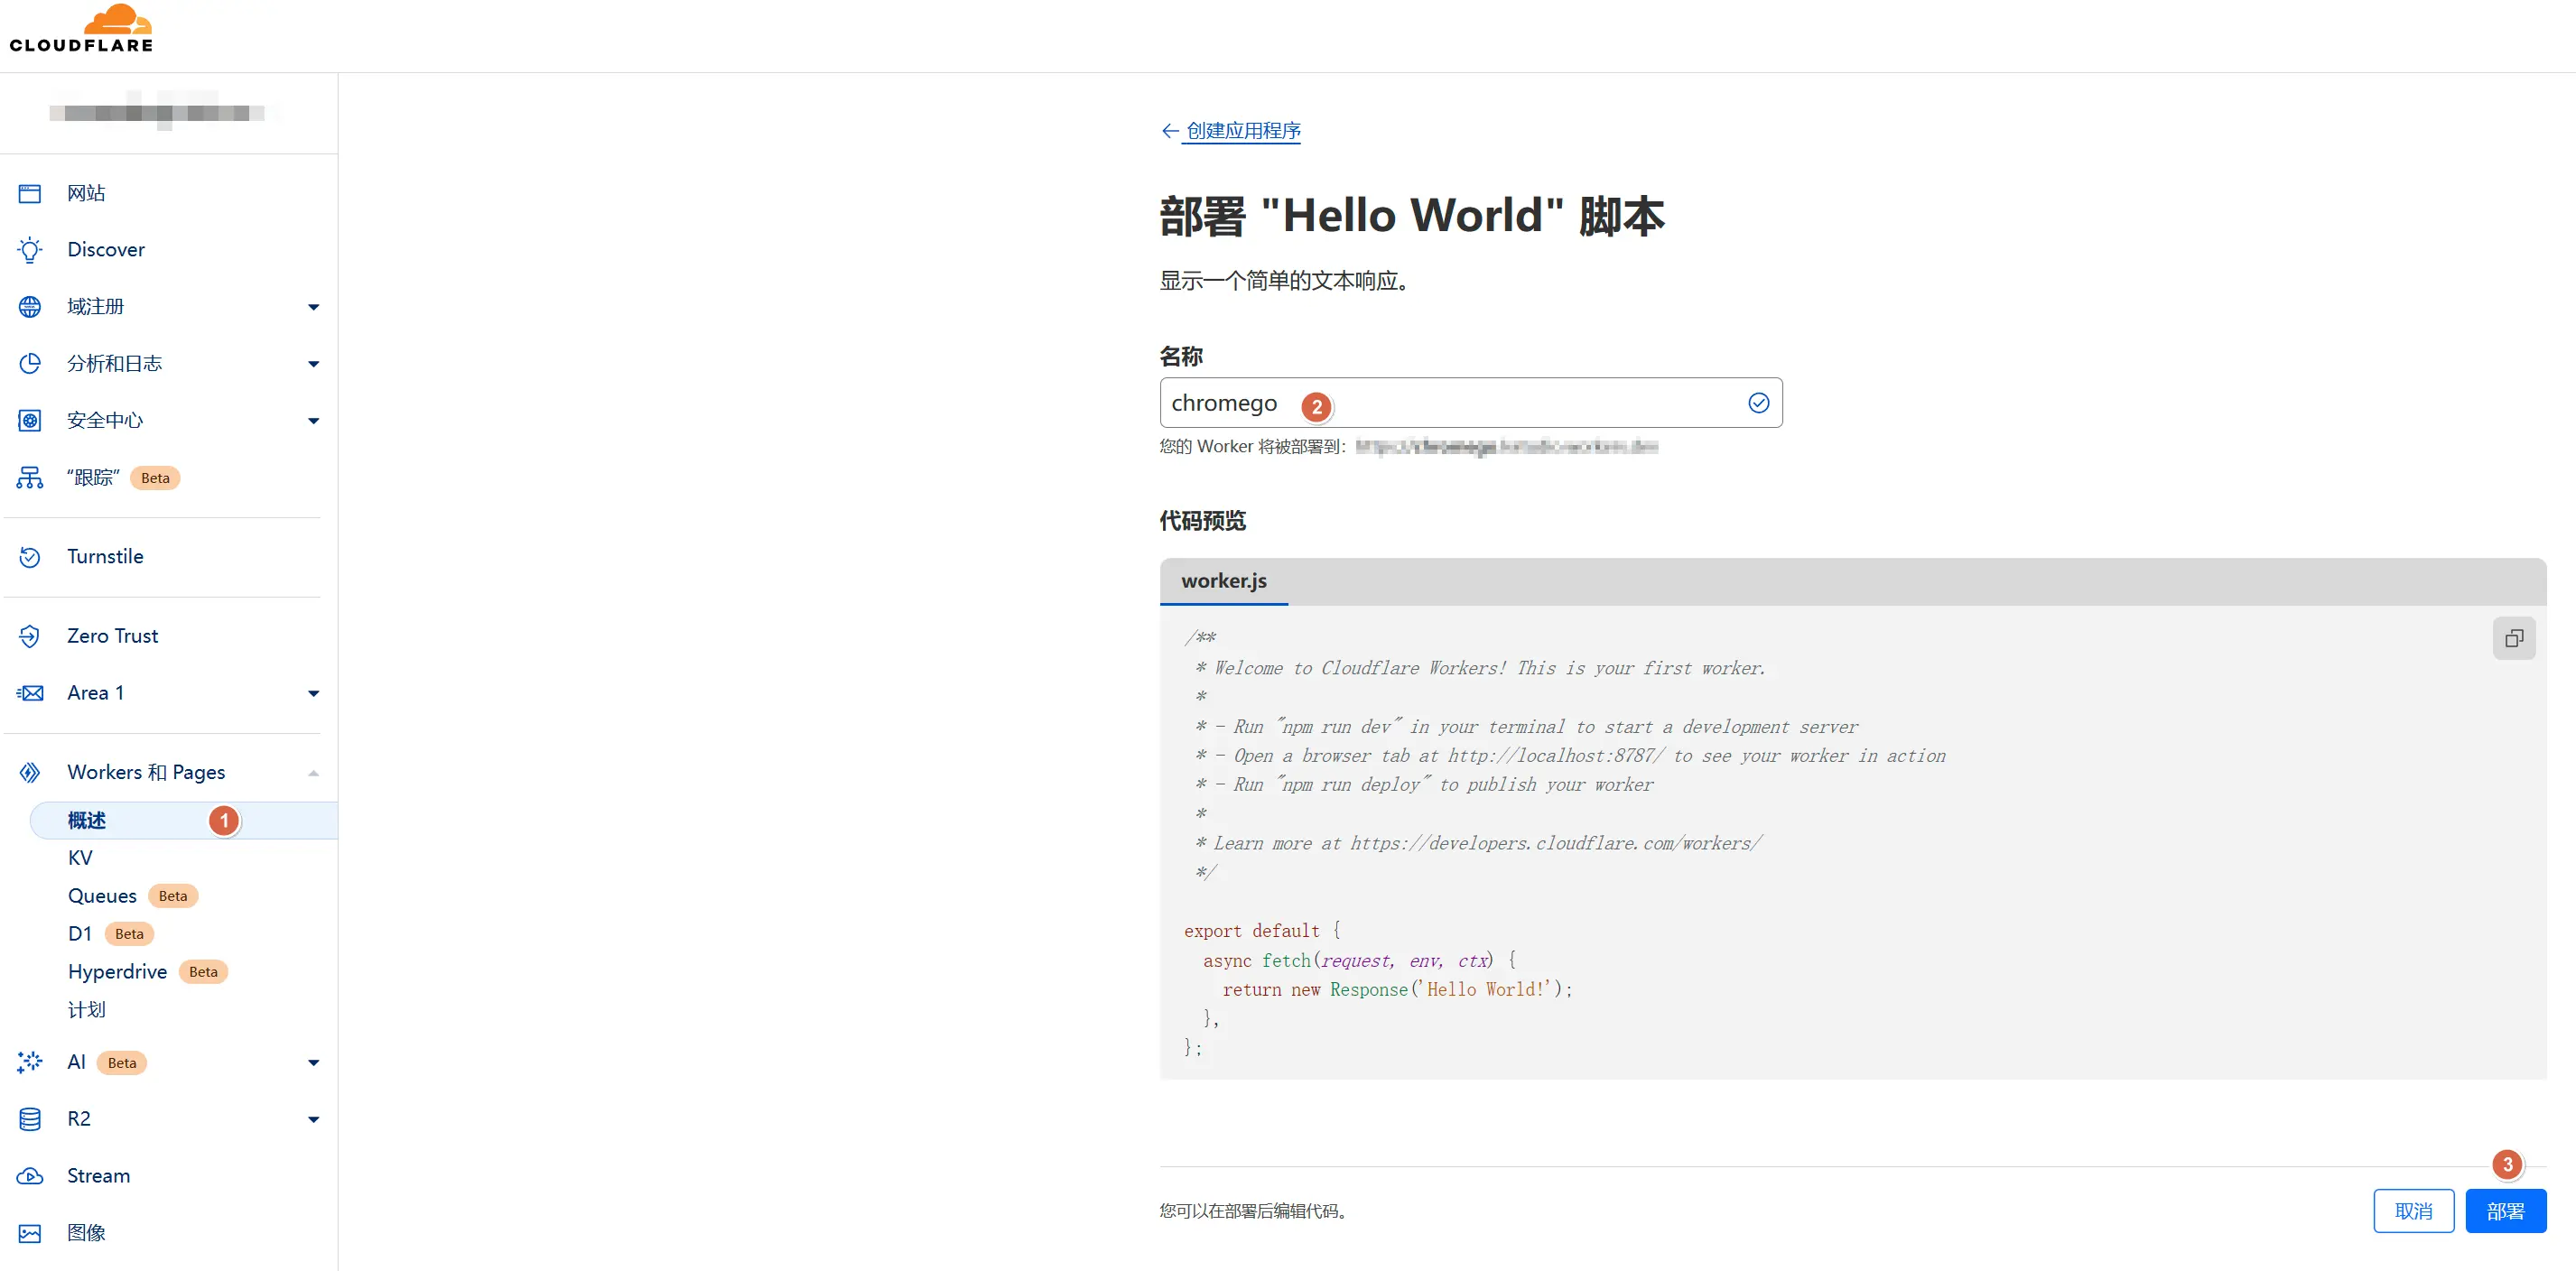
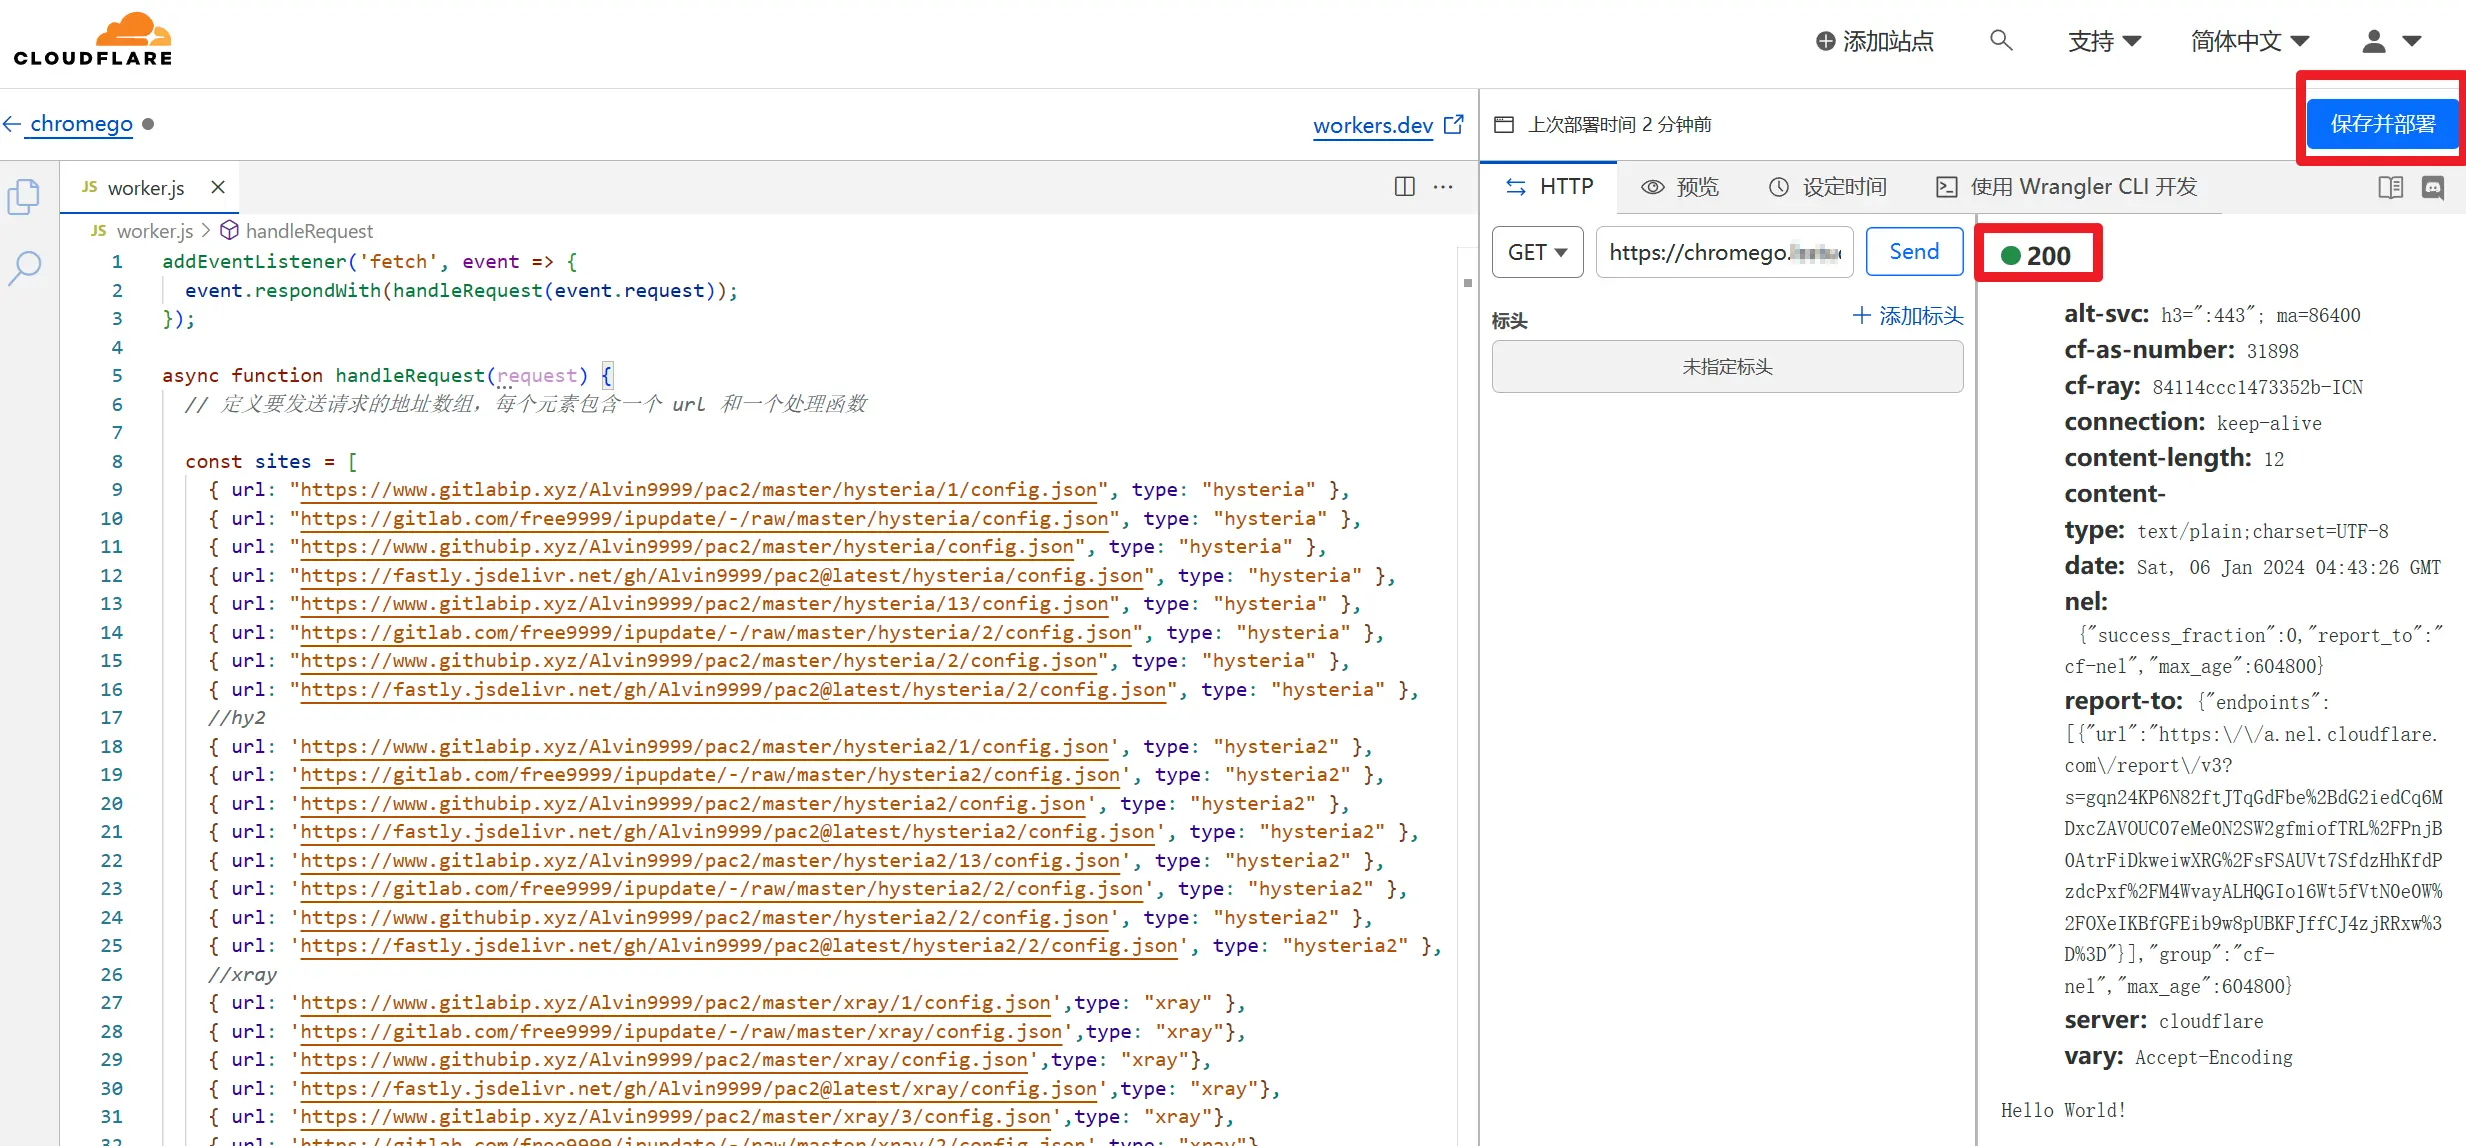
提示创建成功,点击 编辑代码。删除系统默认代码,复制粘贴下面代码。最后点击 保存与部署。
addEventListener('fetch', event => {
  event.respondWith(handleRequest(event.request));
});
async function handleRequest(request) {
  // 定义要发送请求的地址数组,每个元素包含一个 url 和一个处理函数

  const sites = [
    { url: "https://www.gitlabip.xyz/Alvin9999/pac2/master/hysteria/1/config.json", type: "hysteria" },
    { url: "https://gitlab.com/free9999/ipupdate/-/raw/master/hysteria/config.json", type: "hysteria" },
    { url: "https://www.githubip.xyz/Alvin9999/pac2/master/hysteria/config.json", type: "hysteria" },
    { url: "https://fastly.jsdelivr.net/gh/Alvin9999/pac2@latest/hysteria/config.json", type: "hysteria" },
    { url: "https://www.gitlabip.xyz/Alvin9999/pac2/master/hysteria/13/config.json", type: "hysteria" },
    { url: "https://gitlab.com/free9999/ipupdate/-/raw/master/hysteria/2/config.json", type: "hysteria" },
    { url: "https://www.githubip.xyz/Alvin9999/pac2/master/hysteria/2/config.json", type: "hysteria" },
    { url: "https://fastly.jsdelivr.net/gh/Alvin9999/pac2@latest/hysteria/2/config.json", type: "hysteria" },
    //hy2
    { url: 'https://www.gitlabip.xyz/Alvin9999/pac2/master/hysteria2/1/config.json', type: "hysteria2" },
    { url: 'https://gitlab.com/free9999/ipupdate/-/raw/master/hysteria2/config.json', type: "hysteria2" },
    { url: 'https://www.githubip.xyz/Alvin9999/pac2/master/hysteria2/config.json', type: "hysteria2" },
    { url: 'https://fastly.jsdelivr.net/gh/Alvin9999/pac2@latest/hysteria2/config.json', type: "hysteria2" },
    { url: 'https://www.gitlabip.xyz/Alvin9999/pac2/master/hysteria2/13/config.json', type: "hysteria2" },
    { url: 'https://gitlab.com/free9999/ipupdate/-/raw/master/hysteria2/2/config.json', type: "hysteria2" },
    { url: 'https://www.githubip.xyz/Alvin9999/pac2/master/hysteria2/2/config.json', type: "hysteria2" },
    { url: 'https://fastly.jsdelivr.net/gh/Alvin9999/pac2@latest/hysteria2/2/config.json', type: "hysteria2" },
    //xray
    { url: 'https://www.gitlabip.xyz/Alvin9999/pac2/master/xray/1/config.json',type: "xray" },
    { url: 'https://gitlab.com/free9999/ipupdate/-/raw/master/xray/config.json',type: "xray"},
    { url: 'https://www.githubip.xyz/Alvin9999/pac2/master/xray/config.json',type: "xray"},
    { url: 'https://fastly.jsdelivr.net/gh/Alvin9999/pac2@latest/xray/config.json',type: "xray"},
    { url: 'https://www.gitlabip.xyz/Alvin9999/pac2/master/xray/3/config.json',type: "xray"},
    { url: 'https://gitlab.com/free9999/ipupdate/-/raw/master/xray/2/config.json',type: "xray"},
    { url: 'https://www.githubip.xyz/Alvin9999/pac2/master/xray/2/config.json',type: "xray"},
    //singbox
    { url: "https://gitlab.com/free9999/ipupdate/-/raw/master/singbox/config.json",type: "singbox"},
    { url: "https://www.githubip.xyz/Alvin9999/pac2/master/singbox/config.json",type: "singbox"},
    { url: "https://fastly.jsdelivr.net/gh/Alvin9999/pac2@latest/singbox/config.json", type: "singbox"},
    { url: "https://www.gitlabip.xyz/Alvin9999/pac2/master/singbox/1/config.json", type: "singbox"}
    // 添加更多的网站地址和类型...
  ];

  // 存储拼接后的字符串,用于去重
  const uniqueStrings = new Set();

  // 发送请求并处理响应
  async function fetchData(site) {
    try {
      const response = await fetch(site.url);
      const data = await response.json();

      // 根据网站类型选择对应的处理函数
      let formattedString ;
      if(site.type === "hysteria") {
        formattedString = processHysteri(data)
      }
      else if(site.type === "hysteria2") {
        formattedString = processHysteria2(data)
      }
      else if(site.type === "xray"){
        formattedString = processXray(data)
      }
      else {
        formattedString = processSingbox(data)

    }
      // 将拼接的字符串添加到集合中
      uniqueStrings.add(formattedString);
    } catch (error) {
      console.error(`Error fetching data from ${site.url}: ${error}`);
    }
  }

  // 处理类型1的数据
  function processHysteri(data) {
    // 从 JSON 数据中提取字段,并按指定格式拼接字符串
    const up_mps = data.up_mbps;
    const down_mps = data.down_mbps;
    const auth_Str = data.auth_str;
    const server_name = data.server_name;
    const alpn = data.alpn;
    const server = data.server;

    return `hysteria://${server}?upmbps=${up_mps}&downmbps=${down_mps}&auth=${auth_Str}&insecure=1&peer=${server_name}&alpn=${alpn}`;
  }

  // 处理类型2的数据
  function processHysteria2(data) {
    // 根据类型2的数据提取字段,并按指定格式拼接字符串
    // 这里提供一个示例,实际情况需要根据实际数据结构调整
     // 从 JSON 数据中提取所需字段
     const auth = data.auth || '';
     const server = data.server || '';

     // 根据 data.insecure 的值设置 insecure
     const insecure = data.tls.insecure ? 1 : 0;

     const sni = data.tls.sni || '';

    return `hy2://${auth}@${server}?insecure=${insecure}&sni=${sni}`;
  }

  // 处理xray的数据
  function processXray(data) {
    let protocol, address, port, id, encryption, type, security, sni, fp, path, host;
    let outboundConfig = data.outbounds[0];
    protocol = outboundConfig.protocol;
    id = outboundConfig.settings?.vnext?.[0]?.users?.[0]?.id;
    address = outboundConfig.settings?.vnext?.[0]?.address;
    port = outboundConfig.settings?.vnext?.[0]?.port;
    encryption = outboundConfig.settings?.vnext?.[0]?.users?.[0]?.encryption;
    type = outboundConfig?.streamSettings?.network;
    security = outboundConfig?.streamSettings?.security;
    sni = outboundConfig?.streamSettings?.tlsSettings?.serverName;
    fp = outboundConfig?.streamSettings?.tlsSettings?.fingerprint;
    path = outboundConfig?.streamSettings?.wsSettings?.path;
    host = outboundConfig?.streamSettings?.wsSettings?.headers?.Host;

    return `${protocol}://${id}@${address}:${port}?security=${security}&sni=${sni}&fp=${fp}&type=${type}&path=${path}&host=${host}`;
  }

  // 处理singbox的数据
  function processSingbox(data) {
    const outbounds = data.outbounds[0];
    const up_mps = outbounds.up_mbps;
    const down_mps = outbounds.down_mbps;
    const auth_Str = outbounds.auth_str;
    const server_name = outbounds.tls.server_name;
    const alpn = outbounds.tls.alpn[0];
    const server = outbounds.server;
    const port = outbounds.server_port;

    return `hysteria://${server}:${port}?upmbps=${up_mps}&downmbps=${down_mps}&auth=${auth_Str}&insecure=1&peer=${server_name}&alpn=${alpn}`;
  }
  // 遍历所有地址并发送请求
  const promises = sites.map(site => fetchData(site));
  await Promise.all(promises);

  // 构建最终字符串
  const finalStrings = [...uniqueStrings];

  // 生成 HTML 页面内容
  const htmlContent = finalStrings.map(str => `<p>${str}</p>`).join('\n');

  return new Response(htmlContent, {
    headers: { 'Content-Type': 'text/html' },
  });
}
查看提取的免费节点
接下来就可以通过访问 https://chromego.xxxx.workers.dev/ 的形式,查看自动提取出的免费节点。
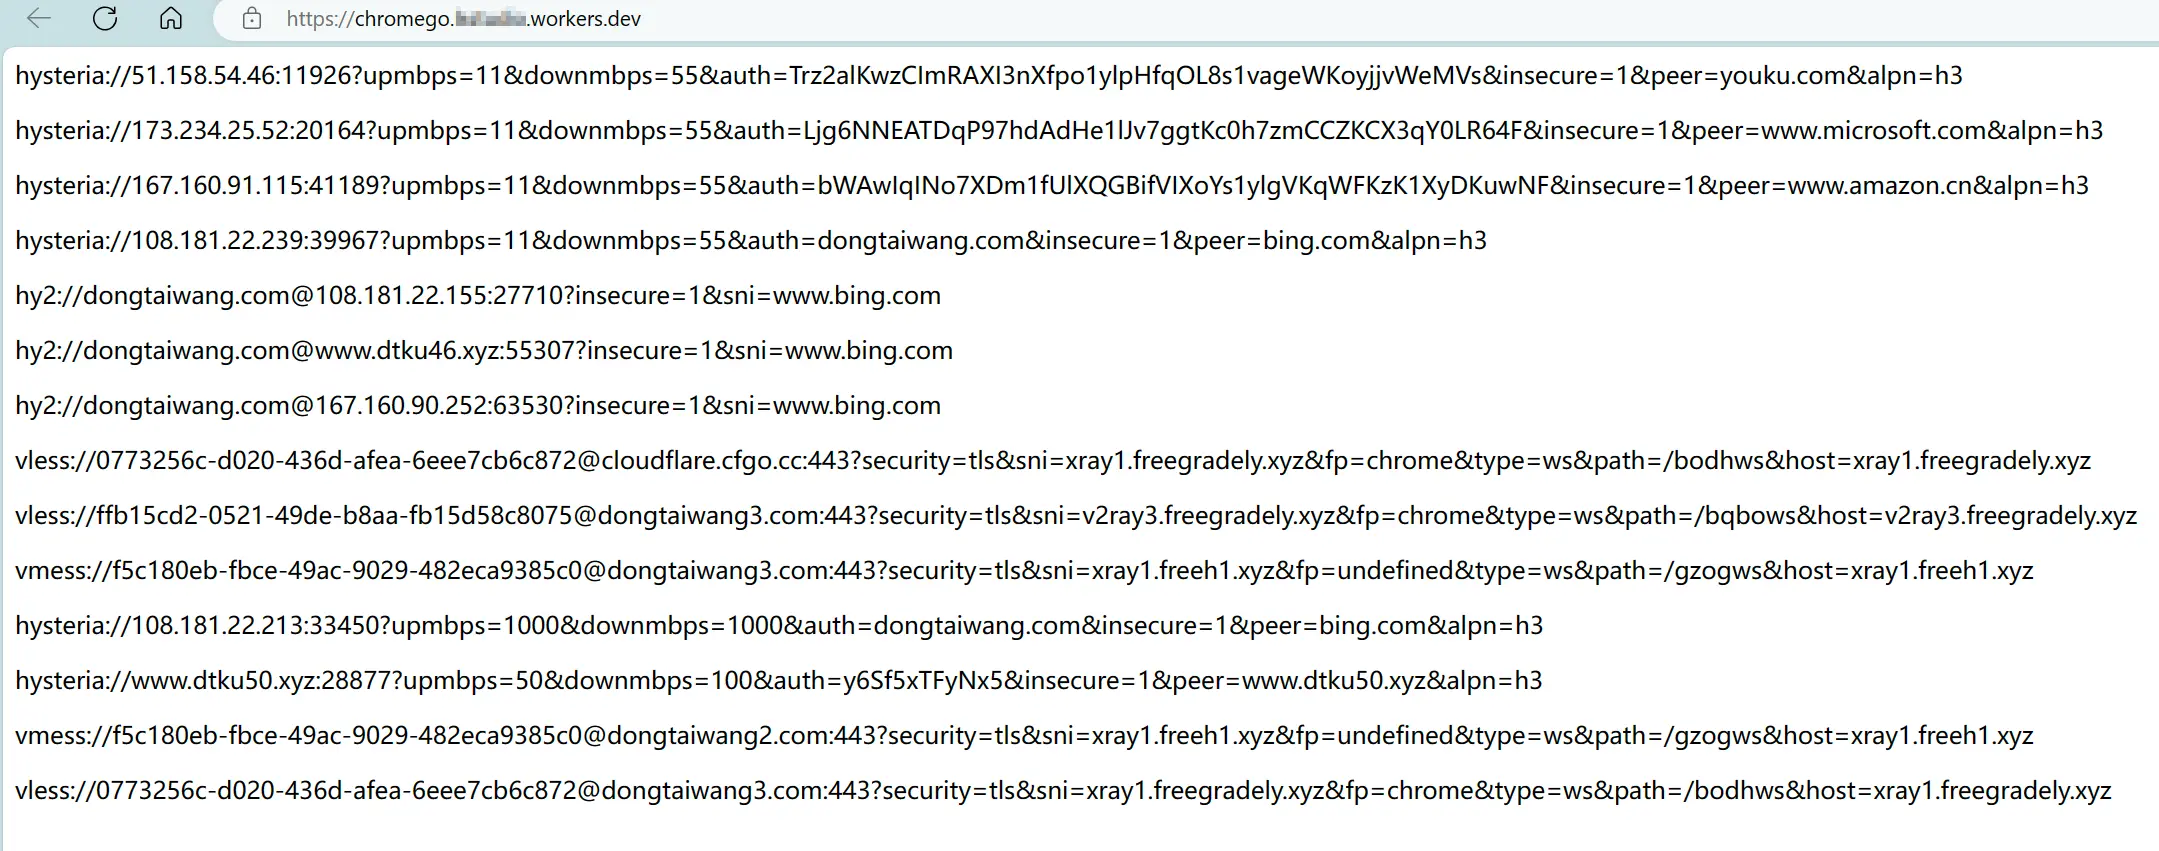
注意:由于 Cloudflare Workers 被滥用,打开上述链接,有可能需要通过代理
(2024-01-10更新)该脚本作者提供了自己维护的提取地址(要开代理才能访问):
- worker 订阅链接:https://chromegolatest.amazinglinyy.workers.dev/
- 自定义域订阅链接:https://chromenodes.marcol.top/
NekoRay – 运行 Hysteria 代理核心
上面提取的节点都是以链接形式呈现的,尤其是 Hysteria 节点,俗称歇斯底里,无法直接复制粘贴到 V2ray 中使用。这里推荐使用 NekoRay 客户端可直接复制粘贴使用提取的免费节点。
介绍
NekoRay 基于 Qt 的跨平台代理配置管理器 (后端 v2ray / sing-box),目前支持 Windows / Linux 开箱即用。
- GitHub 项目地址:https://github.com/MatsuriDayo/nekoray
- 项目网址:https://matsuridayo.github.io/
- 项目帮助文档:https://matsuridayo.github.io/index_docs/
使用方法跟 V2ray 类似,支持订阅更新,节点导入支持手动和剪贴板。这里重点介绍一下如何配置使用 Hysteria 协议。
下载 Hysteria
进入 Hysteria 项目最新下载页面:https://github.com/apernet/hysteria/releases ,下载最新版的 hysteria-windows-amd64.exe,将其放置在 NekoRay 配置目录下,例如:\nekoray\\config\\hysteria-windows-amd64.exe。
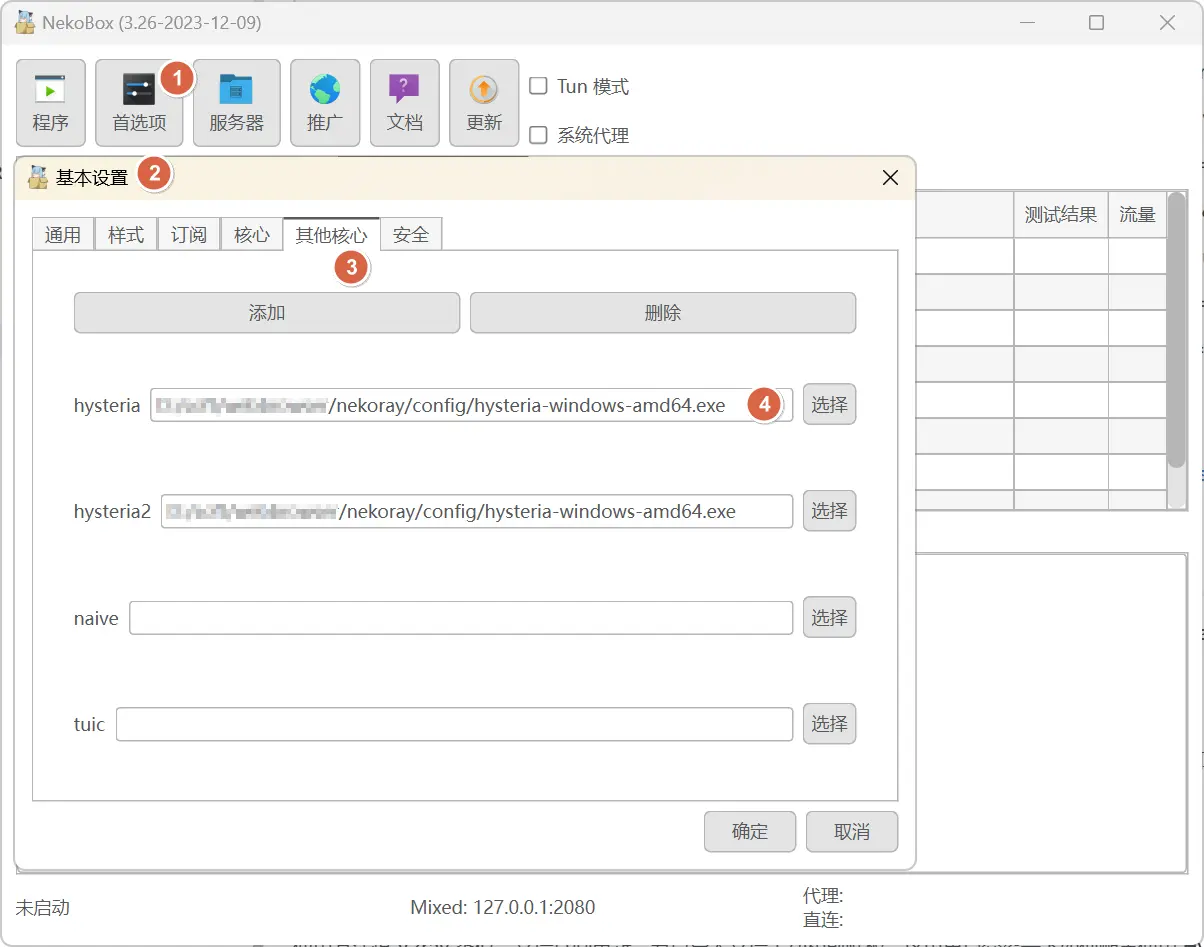
配置 NekoRay 代理核心
这里以最新版 3.26 版本为例:打开 NekoRay,进入「首选项」->「基本设置」->「其他核心」界面,选择 hysteria 的绝对路径,即刚下载的 hysteria-windows-amd64.exe 文件绝对路径。
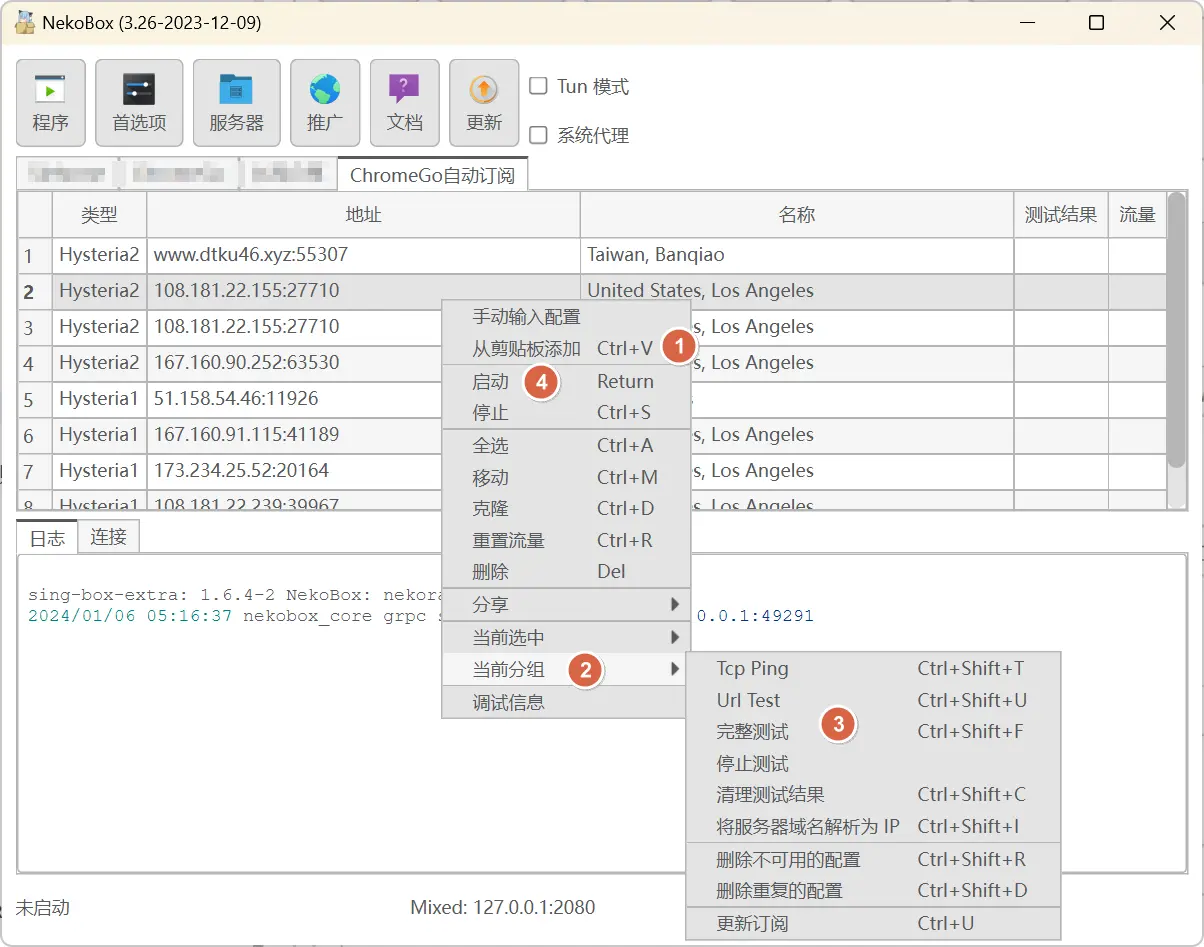
导入启动节点
接下来从剪贴板导入节点,测试没问题后,启动节点,即可使用提取的免费节点进行科学上网了。
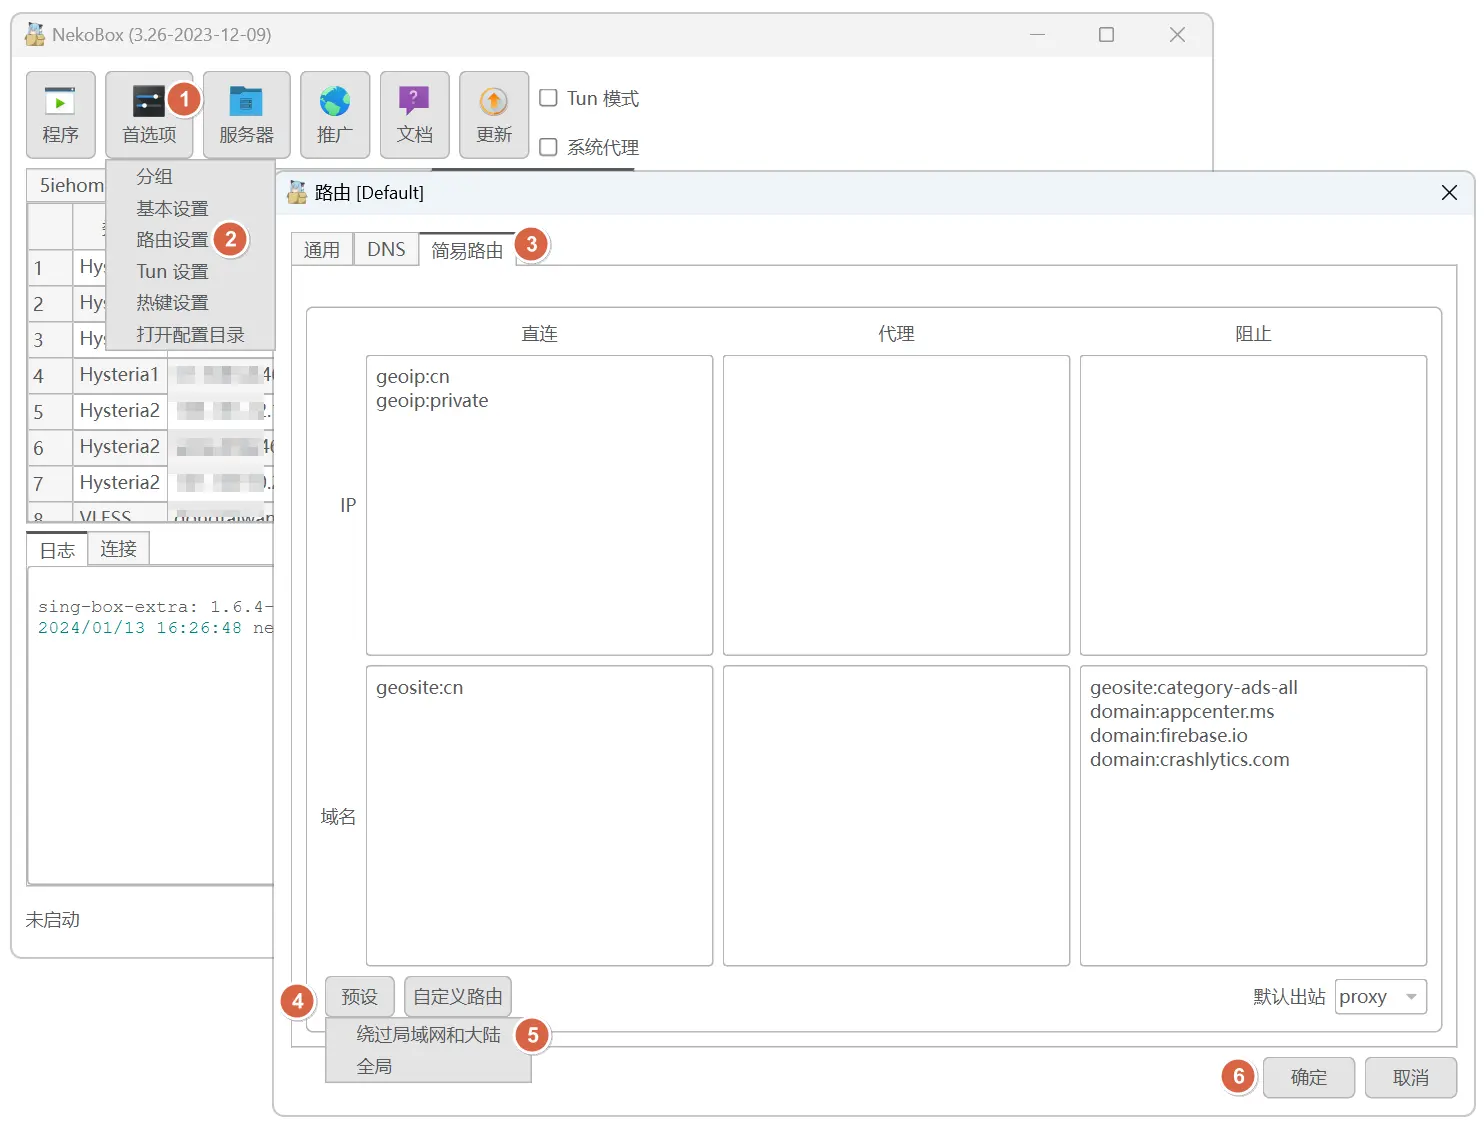
设置绕过局域网和大陆的路由规则
依次点击“首选项”→“路由设置”,转到“简易路由”页,点击“预设”里的“绕过局域网和大陆”,然后点击“确定”即可。
【END】